
This guide walks you through sewing a removable, envelope-back throw pillow cover sized to fit a standard pillow form (for example, a 16 x 16 inch insert). By the end, you will have a washable, professionally finished cover you can swap seasonally without touching the pillow insert itself. The envelope back means no zipper, no buttons, and no hand-sewing — the cover simply overlaps at the back and slides on and off the form.

Get furniture and decor delivered free with Prime
- Fast, free delivery on millions of items
- Prime Video, Amazon Music and more included
- Member-only deals all year
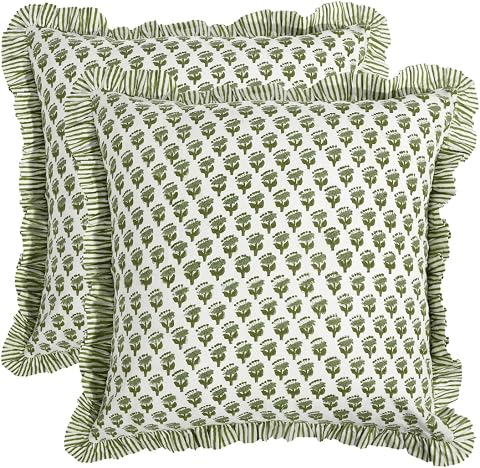
CPC Emerald Green Block Print Ruffle Pillow Covers, 18 x 18 Inch, Set of 2
- ✔ Brand: CPC Cotton Print Club
- ✔ Material: 100% cotton
- ✔ Color: Emerald green

Vintage Floral Striped Throw Pillow Covers, Set of 2, 18 x 18 Inches, Light Brown
- ✔ Material: 90% cotton, 10% polyester
- ✔ Pattern: Vintage floral and striped
- ✔ Size: 18 x 18 inches

THE-TINOART Textured Beige and Gold Jacquard Throw Pillow Covers, 18 x 18 Inches, Set of 2
- ✔ Brand: THE-TINOART
- ✔ Front Material: 70% polyester, 30% viscose jacquard
- ✔ Back Material: 100% polyester velvet
This guide is written for beginners. If you can sew a straight line on a sewing machine, you can complete this project. You will need basic sewing supplies and roughly one hour for your first cover. Once you have made one, repeat covers go much faster because the measuring decisions are already made.
Difficulty: Beginner | Time: 45-60 minutes for the first cover; 20-30 minutes for each additional cover
What You’ll Need
Tools & Materials:
- Sewing machine with a straight stitch (a zigzag or overcast stitch is optional for finishing raw edges)
- Fabric scissors or a rotary cutter with a cutting mat
- Measuring tape or clear quilting ruler
- Iron and ironing board
- Straight pins or fabric clips
- Water-soluble fabric marker or tailor’s chalk
- Pillow form (also called a pillow insert) in your desired size — 16 x 16 or 18 x 18 inches is easiest for a first project
Knowledge:
- Threading and operating a basic sewing machine
- Sewing a straight seam at a measured seam allowance
- Pressing fabric with an iron safely
Fabric choice: Use a medium-weight woven fabric such as cotton, canvas, linen, or cotton-linen blend. Avoid stretchy knits, slippery satins, and very loose weaves for your first cover — they shift while cutting and sewing. Pre-wash and dry your fabric before cutting so the finished cover does not shrink unevenly later. Purchase at least 1 yard (about 36 x 44 inches) of fabric for a 16-18 inch pillow; a half yard is not enough for the back panels.
Thread: Match thread to your dominant fabric color, or use a neutral gray or tan that blends with most fabrics.
CPC Emerald Green Block Print Ruffle Pillow Covers, 18 x 18 Inch, Set of 2
Of the three sets, this is the one we’d put on a living room sofa first. The 100% cotton construction gives it a softness and breathability the polyester-heavy jacquard set can’t match, and the deep emerald green floral block print reads as artisan rather than mass-market. The ruffle trim adds a layer of texture that works especially well in farmhouse, cottage, and bohemian interiors.Practicality is solid too: a zipper closure makes insert changes easy, and full machine washability — no laundry bag, no hand-wash caveats — is simpler than the fussy care routine the Vintage Floral set requires. The fabric is also treated to resist fading, shrinking, and wear. Compared with the THE-TINOART set, it sacrifices visual sheen and two-sided styling, but gains a natural fiber feel that’s cooler against skin and better suited to everyday lounging. The one universal gripe: inserts aren’t included, so factor that into the total cost.
Pros:
- Soft, breathable 100% cotton that stays comfortable year-round
- Distinctive block print with ruffle trim for artisan character
- Fully machine washable with no special care steps
- Fade-resistant and shrink-resistant fabric treatment
Cons:
- Pillow inserts are not included
- Exposed zipper looks less refined than hidden-zipper competitors
- Bold green print is a stronger style commitment than neutral options
Best for: Buyers styling a cottage, farmhouse, or boho space who want breathable natural cotton and an artisan look with easy care.
Not ideal for: Anyone wanting a luxe, high-sheen look, or those who need an outdoor-rated cover.
Bottom line: The best balance of natural fabric, distinctive design, and easy care makes this our top overall pick.
“The best balance of natural fabric, distinctive design, and easy care makes this our top overall pick.”
Vintage Floral Striped Throw Pillow Covers, Set of 2, 18 x 18 Inches, Light Brown
This set plays a different role in the lineup: it’s the most versatile neutral. The light brown vintage floral-and-stripe pattern blends into far more decor schemes than the CPC’s saturated emerald or the THE-TINOART’s metallic gold, and it’s the only option here rated for outdoor use — making it a smart choice for a covered porch, sunroom, or banquette seating.Construction is more thoughtful than the price positioning suggests. The hidden zipper gives it a cleaner finish than the CPC set, and the 90/10 cotton-polyester blend is a deliberate compromise: slightly less breathable than pure cotton, but more resilient to sun and repeated washing. The color-fast printing is designed to hold up where direct light would fade lesser covers. The tradeoff is care — hand washing is recommended, machine washing requires a laundry bag, and ironing is off the table, so expect some wrinkling. If you want maximum low-maintenance cotton, choose the CPC set; if you want flexibility across rooms and patios, this is the smarter buy.
Pros:
- Versatile light brown vintage floral pattern suits most color schemes
- Rated for both indoor and outdoor use — unique in this lineup
- Hidden zipper and precise stitching for a clean, finished look
- Color-fast printing resists sun fading
Cons:
- Hand wash recommended; machine wash requires a laundry bag
- Cannot be ironed, so wrinkles may persist
- Pillow inserts are not included
Best for: Budget-conscious buyers who want a neutral pattern that works indoors and on covered outdoor seating.
Not ideal for: Anyone who wants zero-fuss, toss-in-the-wash care or a bold statement color.
Bottom line: The most flexible set here — a gentle-care tradeoff buys you indoor-outdoor versatility the others can’t offer.
“The most flexible set here — a gentle-care tradeoff buys you indoor-outdoor versatility the others can’t offer.”
THE-TINOART Textured Beige and Gold Jacquard Throw Pillow Covers, 18 x 18 Inches, Set of 2
If the other two sets are about comfort and versatility, this one is about visual impact. The textured jacquard front woven with metallic gold threads catches light in a way flat-printed cotton simply cannot, and the abstract beige-and-gold palette slots effortlessly into glam, modern, and warm-minimalist interiors. It’s the set we’d reach for when styling a formal living room or a primary bedroom that needs a touch of luxury.What sets it apart structurally is the two-sided construction: a jacquard front and a soft cream-beige velvet back, effectively giving you two looks per cover. Flip them to the velvet side for a quieter, cozier mood — an option neither competitor offers. The hidden zipper keeps the silhouette clean, and full machine washability on a gentle cycle beats the Vintage Floral set’s hand-wash routine. The honest drawback is material: with a polyester-viscose jacquard front and polyester back, it lacks the natural breathability of the CPC’s pure cotton, and metallic threads can look out of place in rustic or casual spaces. As with the others, inserts are sold separately.
Pros:
- Two-sided design: metallic jacquard front and soft velvet back
- Gold-thread weaving adds a luxe, light-catching sheen
- Hidden zipper for a clean, seamless finish
- Machine washable on gentle cycle — easier care than the floral set
Cons:
- Fully synthetic fabric is less breathable than cotton
- Metallic gold look can clash with rustic or casual decor
- Pillow inserts are not included
Best for: Buyers styling a glam, modern, or warm-neutral space who want rich texture and a subtle metallic sheen.
Not ideal for: Fans of natural fibers, rustic or cottage aesthetics, or anyone wanting an outdoor-capable cover.
Bottom line: The most luxurious-looking set of the three, with a two-texture design that justifies its premium positioning.
“The most luxurious-looking set of the three, with a two-texture design that justifies its premium positioning.”
As an Amazon Associate we earn from qualifying purchases.
Before You Start
Set up a flat, hard surface for cutting and a separate space for the iron. Confirm your sewing machine is threaded and test the straight stitch on a fabric scrap to verify tension before you begin — a two-minute test now prevents unpicking seams later.
Know the exact size of your pillow form. Measure it with a tape rather than trusting the label, since inserts vary. Write the measurement down; all cutting calculations depend on it.
The cutting formula used in this guide produces a cover slightly smaller than the form (1 inch smaller in both dimensions). This is intentional. A snug cover creates the full, corner-filling look of a store-bought pillow. If you cut the cover the same size as the form, the finished pillow will look loose and flat.
Step-by-Step Instructions
Step 1: Measure the pillow form and calculate your cutting dimensions
Lay the pillow form flat and measure its width and height with a tape. Then calculate three pieces:
- Front panel: cut one piece equal to (form width − 1 inch) x (form height − 1 inch). For a 16 x 16 inch form, cut 15 x 15 inches.
- Back panels: cut two pieces each (form width − 1 inch) tall, but the width of each equals half the form height plus 4 inches. For a 16 x 16 form, cut two pieces 15 inches tall x 12 inches wide.
Write these three numbers on paper before cutting anything.
Tip: The extra 4 inches on the back panels creates the 2-inch overlap that closes the cover without a fastener. Cutting it too small is the most common cause of a cover that gaps open at the back.
Check: You have three written measurements: one front panel and two identical back panels, all based on the form’s actual measured size.
Step 2: Cut the three fabric panels
Press your pre-washed fabric with the iron to remove wrinkles. Lay it flat on your cutting surface, right side down. Using your ruler and fabric marker, mark the front panel dimensions, then measure and mark the two back panels. Square your corners by aligning the ruler edge exactly perpendicular to the fabric’s selvage edge before marking. Cut all three panels with scissors or a rotary cutter.
Tip: Always measure twice from the same reference edge. If you measure from a cut edge that has drifted off square, every subsequent panel inherits the error.
Check: All three panels match your written measurements within about 1/8 inch, and each corner forms a clean 90-degree angle.
Step 3: Hem one long edge of each back panel
Take one back panel and fold one of its long edges (the 15-inch edge in our example) over by 1/2 inch, wrong side to wrong side, and press. Fold it over again by another 1/2 inch so the raw edge is fully enclosed inside the fold, and press again. Pin the folded hem in place. Sew a straight line down the length of the hem, about 3/8 inch from the folded edge, backstitching at the start and end. Remove pins, then repeat this entire process on the second back panel.
Tip: These two hemmed edges will become the visible overlap opening at the back of the cover, so take your time and keep the stitching line straight — it shows.
Check: Both back panels have one clean finished edge with no visible raw fabric, and the stitch lines run parallel to the fold.
Step 4: Pin the front and back panels together
Lay the front panel on your table with the right side facing up. Lay one back panel on top of it, right side facing down, with the hemmed edge running horizontally across the middle. Lay the second back panel on top of that, right side down, also with the hemmed edge horizontal. The two hemmed edges should overlap each other by about 3-4 inches in the center. Pin around the entire outer perimeter every 2-3 inches, matching all four corners exactly.
Tip: The cover is being assembled inside-out. Right sides together means the fabric you want showing on the finished pillow is currently hidden facing inward.
Check: The pinned stack is a perfect square or rectangle with raw edges aligned on all four sides, and the center overlap is covered by pins so it cannot shift.
Step 5: Sew around the outer perimeter
Set your machine to a straight stitch with a standard 2.5 mm length. Starting near the middle of one side, sew a 1/2-inch seam allowance all the way around the pinned perimeter. Pivot at each corner: stop with the needle down in the fabric, lift the presser foot, turn the fabric 90 degrees, lower the foot, and continue. Backstitch over your starting point when you return to it to lock the seam. Remove pins as you go.
Tip: Do not sew across the center overlap — only around the outer edges. The overlap must stay open; it is how the pillow form goes in.
Check: You have one continuous sewn square with four crisp pivoted corners and a 1/2-inch seam allowance on all four sides.
Step 6: Finish the seams and trim the corners
Trim each of the four sewn corners diagonally, cutting off the point about 1/4 inch from the stitch line without cutting the stitches. If your fabric frays, run a zigzag or overcast stitch along all four raw seam edges. Press the seam allowances open flat with the iron.
Tip: Trimming the corner bulk is what allows the finished pillow to form sharp, full corners instead of rounded, lumpy ones.
Check: Corners are trimmed, raw edges are finished or pressed, and the sewn cover still lies flat with no puckers.
Step 7: Turn the cover right side out and press
Reach through the envelope opening at the back and pull the cover right side out. Use a point turner, chopstick, or the eraser end of a pencil to gently push each corner out to its full point. Press the entire cover flat with the iron, paying attention to the edges so they lie crisp.
Tip: Push corners out gently. Forcing a sharp object too hard can poke through the corner seam.
Check: The cover is a smooth, flat square with sharp corners, a finished front, and a horizontal envelope opening at the back with two hemmed overlapping flaps.
Step 8: Insert the pillow form
Fold the pillow form gently in half, push it through the envelope opening, and release it inside the cover. Work the form’s corners into the cover’s four corners by kneading them through the fabric from the outside. Adjust the overlap flaps at the back so they lie flat and fully closed across the opening.
Tip: Squeezing the form as you insert it compresses the filling temporarily, making it slide in without fighting the fabric.
Check: The cover fits snugly with no bagginess, all four corners are filled, the front is smooth, and the back overlap stays closed with no insert visible.
Common Mistakes to Avoid
- Cutting the cover the same size as the pillow form, producing a loose, saggy pillow. — Subtract 1 inch from both the width and height of the form when calculating the front panel. The snug fit is what creates the full, professional look.
- Making the back panels too narrow so the envelope overlap gapes open. — Each back panel must be half the form height plus 4 inches wide. Measure the overlap after pinning in Step 4 and confirm it is at least 3 inches before sewing.
- Sewing with stretch in the fabric or without pre-washing, causing a warped or shrunken cover. — Use a stable woven fabric, pre-wash and dry it, and press before cutting. Let the machine feed the fabric without pulling or pushing it.
- Skipping the corner trimming, leaving rounded or bunched corners on the finished pillow. — Always trim each corner diagonally close to — but not through — the stitching before turning the cover right side out.
Troubleshooting
Problem: The envelope opening gapes open and shows the pillow insert after insertion.
Solution: The back panels were cut too narrow or the form is oversized for the cover. Remove the form, unpick the perimeter seam on the two back edges only, and sew replacement back panels cut 1-2 inches wider. Alternatively, switch to a slightly smaller form.
Problem: The finished cover has puckered or wavy seams.
Solution: This is usually tension or handling. Check that both thread tensions match by test-stitching on a doubled scrap, and re-sew the problem seam without pulling the fabric. If the fabric itself shifted, pin more densely (every 1-2 inches) on the next cover.
Problem: The corners look rounded or empty even after trimming.
Solution: Push the corners out fully with a point turner, then knead the insert’s filling outward into each corner from the outside. If the cover was cut the exact form size rather than 1 inch smaller, the extra fabric also causes empty corners — remake with the smaller cutting dimensions.
Problem: The fabric frays badly at the seams after washing.
Solution: Finish all raw seam edges with a zigzag or overcast stitch before or after sewing the perimeter, or use a wider 5/8-inch seam allowance on loosely woven fabrics.
What Success Looks Like
Your project is complete when the cover fits the pillow form snugly with no loose fabric on the front or sides, all four corners are filled and sharply pointed, the seams lie flat with no puckering, and the envelope opening at the back stays fully closed with the overlap hidden. The cover should slide off the form easily when you reach inside and pull it through the opening, which is what makes it washable and replaceable.
Next Steps
Make a matching or contrasting set: two identical pillows on a sofa read as intentional styling, while an odd-numbered grouping of three in coordinated fabrics looks layered. Keep your written cutting dimensions on file — every future cover in that size becomes a 20-minute project.
To care for the cover, remove it from the form and machine wash it cold on gentle, then line dry or tumble dry low and press while slightly damp. Store off-season covers flat in a bin with the dimensions noted on a label.
When you are comfortable with the basic envelope cover, try adding piping or trim to the front panel seam, experimenting with a hidden zipper back instead of an envelope, or quilting the front panel for texture.
Frequently Asked Questions
How much fabric do I need for one throw pillow cover?
One yard of standard 44-inch-wide fabric comfortably makes one cover for a 16-18 inch pillow form with room for straightening the grain and shrinkage. Half a yard works only if you buy separate fabric for the back panels.
Can I make this cover without a sewing machine?
Yes, but it is slower. You can hand-sew the perimeter seam with a tight backstitch and hand-hem the two back edges. Use a sturdy needle and doubled thread, and keep hand stitches small (about 1/8 inch) so the seams hold up to the form being inserted and removed.
Why does my finished pillow look flat and loose instead of full?
The cover was cut too large for the form. Cut the front panel 1 inch smaller than the form in both dimensions so the insert compresses slightly inside, which pushes the filling into the corners and creates the firm, rounded-professional look.
What is the best pillow form to use?
A feather-down or down-alternative insert in a size at least 1-2 inches larger than the cover gives the best fullness — for a 16-inch cover, use an 18-inch insert. Firm foam inserts work too but give a boxier look with sharper edges.
Can I use the same method for a large floor pillow?
Yes, but increase the envelope overlap to 5-6 inches on large covers (24 inches and up) so the heavier form cannot force the back opening apart, and consider adding a button or hidden closure at the overlap for extra security.
Halloween Picks
halloween
As an affiliate, we earn on qualifying purchases.